

Authentication
Introduction
iPayroll and CloudPayroll use OAUTH2 Authorisation Code Grant. A user with the role of API User (resource owner) is required to authorise an external application to access their organisation in either iPayroll or CloudPayroll via the API.
As of June 24, 2020 we will no longer support TLS 1.0 or TLS 1.1 over HTTPS. Any older browsers or API clients that do not support TLS 1.2 will no longer work. The TLS protocol is used to encrypt your servers’ communications with us, so it’s important that your integration uses the latest version.
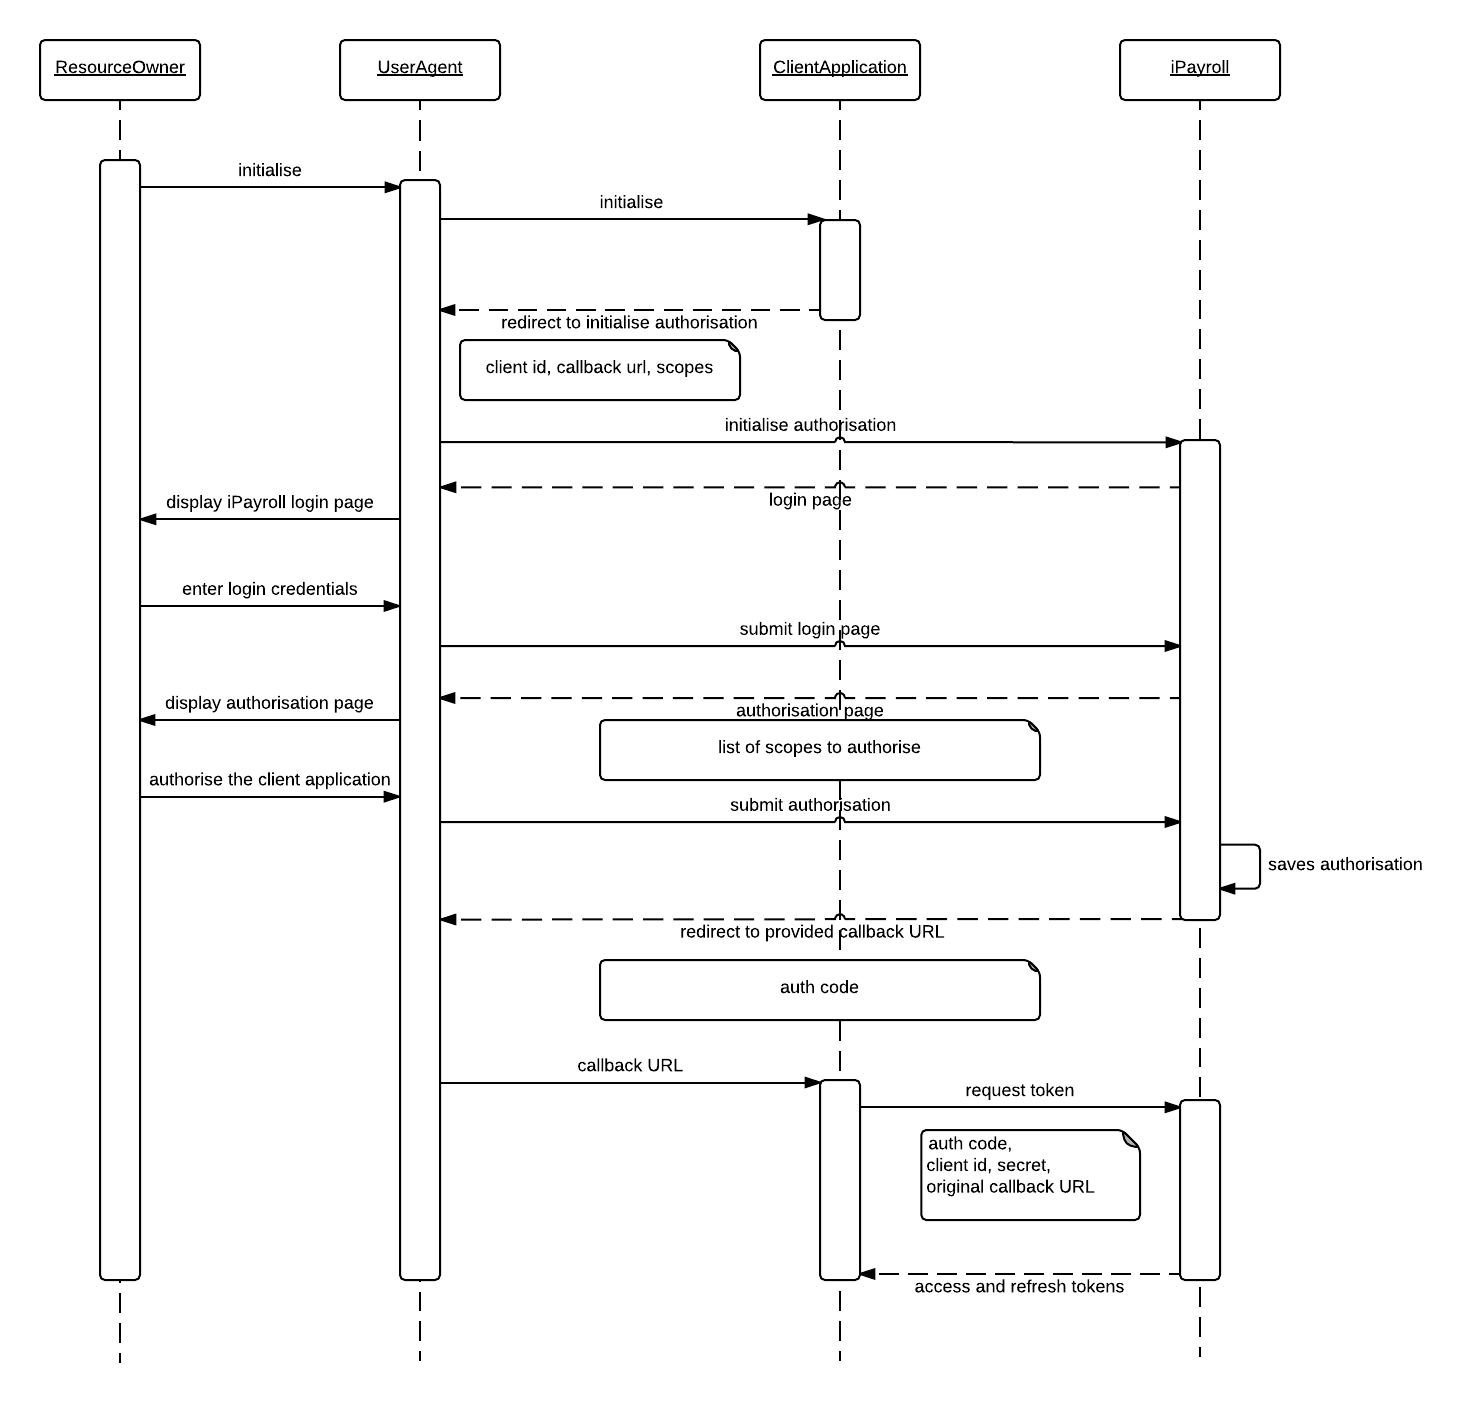
The following sequence diagram illustrates how the authorisation process works:
Request Permission
Before a third party application can make any API call, it needs the permission of a resource owner. Depending on types of data that the application is planning to access, it may request permission to access one or more scopes.
This is achieved by redirecting the browser that initiated the request (UserAgent) to iPayroll's and CloudPayroll's authorisation endpoint.
https://<SERVER-DOMAIN>/oauth/authorize?response_type=code&client_id=<CLIENT_ID>
&scope=<LIST_OF_SCOPES>&redirect_uri=<CALLBACK_URL>&state=<STATE>
Response type should always be code. It is an OAuth 2 specific parameter.
Client id is the unique identification of your application.
List of scopes that the application needs the resource owner to grant permission to. If multiple scopes are specified, separate them by a space.
Redirect URI is used for returning control back (callback) to the application once authentication process completes. Note that in our Production environment you will be required to provide a static callback url that can't contain variable subdomains, paths or queries.
State is an optional parameter that can be used to maintain a state, and is a reference to the request instance. The value passed would be returned back to the redirect URI when the callback is made.
Authorisation
The resource owner is required to authenticate itself to iPayroll / CloudPayroll in order to grant permission to an application. Therefore, https://<SERVER-DOMAIN>/oauth/authorize is a protected endpoint.
If the resource owner is not already logged in, iPayroll / CloudPayroll would redirect the user agent to the standard login page. But if already logged in, this step is skipped.
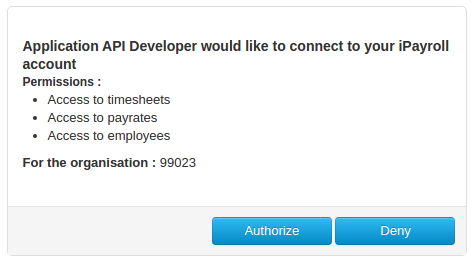
Once successfully authenticated, the following page is displayed asking for the resource owner's permission to grant access.
If the resource owner grants permission, the client application is notified via the callback URI.
The authorisation is a one-off process. Once an API User has authorised the integration, unless you change the scopes, or the refresh token expires (in 10 years time), you should not need to re-authorise again.
Request Tokens
Once the application receives the authentication code, it should request for tokens that could be used for making subsequent API calls by making the following HTTP POST request:
	Request type: POST
	URL: https://<SERVER-DOMAIN>/oauth/token
	Parameters:
	grant_type=authorization_code
	client_id=<CLIENT_ID_OF_THE_APPLICATION>
	client_secret=<CLIENT_SECRET>
	code=<AUTH_CODE_RECEIVED>
	redirect_uri=<CALLBACK_URL_USED_FOR_THE_AUTH_REQUEST>
Grant type is an OAuth 2 specific parameter and it should always be set to authorization_code.
Client id and client secret are application specific properties and they are used for authenticating the application to iPayroll / CloudPayroll.
Code is the authentication code received in the callback. This identifies a particular authentication that is being made by a resource owner.
Redirect URI is the same URI that was passed when making the authorisation call. It is passed on for verification purposes and part of OAuth 2 specification.
If successful, the server would respond with the following:
  {
	"access_token":"<ACCESS_TOKEN>",
	"token_type":"bearer",
	"refresh_token":"<REFRESH_TOKEN>",
	"expires_in":<NUMBER_OF_SECONDS_THE_ACCESS_TOKEN_EXPIRES_IN>,
	"scope":"<LIST_OF_SCOPES_AUTHORISED>"
  }
Once an application acquires tokens by passing an authorisation code, that code would be deleted. Subsequent calls with the same authorisation code would not return tokens. Therefore, it is client application's responsibility to hold onto tokens.
Access Token Expiry
Once you have received the access and refresh tokens from the initial authorisation, you should be able to use the refresh token to generate a new access token. Access tokens expire after 5 minutes.
The received access token can be used for making API calls till it expires. The system will return the following error, along with a 401 status code, when it expires:
{
	"error": "invalid_token",
	"error_description": "Invalid access token: <ACCESS_TOKEN>"
}
The following request can be made to get a new access token using the refresh token:
	Request type: POST
	URL: https://<SERVER-DOMAIN>/oauth/token
	Parameters:
	grant_type=refresh_token
	client_id=<CLIENT_ID_OF_THE_APPLICATION>
	client_secret=<CLIENT_SECRET>
	refresh_token=<REFRESH_TOKEN>
The server would reply with the same response as the request tokens method.
Refresh Token Expiry
By default, refresh token is valid for 10 years. The value can be further increased if required. However, if the validity period of the refresh tokens is decreased, the application should handle expired refresh tokens.
When a new access token is requested passing a refresh token, server would reply back with the following error message if the refresh token is expired:
  {
	"error": "invalid_token",
	"error_description": "Invalid refresh token (expired): <REFRESH_TOKEN>"
  }
The client application should initiate a request tokens method to get a new refresh token. As this method expects a new authorisation code, the client application should first initiate a request permission call to get an authorisation code. Since a resource owner has already authorised the application, the grant permission page would be bypassed in this scenario.
Making Requests
API method calls expect the access token to be passed in with incoming requests.
You must use the standard HTTP authorization header to pass the access token:
Header: Authorization
Value: <access_token>
Token generation for development
When you are developing against our API in our demo environment, you may desire to generate a token without having to programmatically perform all of the steps outlined on this page. This can be achieved by using your normal web browser alongside a tool such as Postman, Restlet Client, or Insomnia.
These instructions assume that you do not have an actual server to receive the callback, containing the code needed for getting a token, and are for development purposes only.
When moving in to production, we require you to set up an appropriate server to process the callbacks as described above in the Request Permission section above.
- Start by ensuring that you are completely logged out from the iPayroll / CloudPayroll website in your web browser.
- Combine your client id and scopes into a url for the authorize endpoint as per the Request Permission section above.
https://<SERVER-DOMAIN>/oauth/authorize?redirect_uri=http://localhost&response_type=code&client_id=xxxxxxxx-xxxx-xxxx-xxxx-xxxxxxxxxxxx&scope=employees&state=1234
We suggest using a redirect_uri server of localhost, like the example above, with the assumption that it doesn't actually exist. - Copy the url, paste it in to your web browser of choice, and go to the page. This will take you to the iPayroll / CloudPayroll login page. You need to log in using an Api User Account for the organisation that you want to use the API for.
- If you have previously authorised the requested scopes, skip to step 5.
Otherwise, if this is the first time you have used the API on this organisation, you will be presented with the Authorisation page (as described above). Confirm that the API scopes listed are what you expect and then click Authorize. - The website will now attempt to load your redirect uri that was provided in step 2. Because this server likely doesn't exist, your browser will show an error page. This is normal and expected. If you look in the address bar of the browser, you will see it looks something like:
http://localhost/?code=a1B2c3&state=1234
Copy the code portion of the address eg. a1B2c3. - Switch to one of the tools mentioned earlier (Postman, Restlet or Insomnia) as you cannot do this step inside your normal web browser.
Using this application, you need to send a POST request as described in the Request Tokens section above.https://<SERVER-DOMAIN>/oauth/token?code=a1B2c3&grant_type=authorization_code&client_id=xxxxxxxx-xxxx-xxxx-xxxx-xxxxxxxxxxxx&client_secret=A1b2C3d4E6f7G8h&redirect_uri=http://localhost
Note that the code from step 5 has been added in to the parameters in the url. - Send this request to the server and you will receive a json reply containing your API access token and refresh token.
- Now you can make use of that token to perform API requests against the authorised organisation.